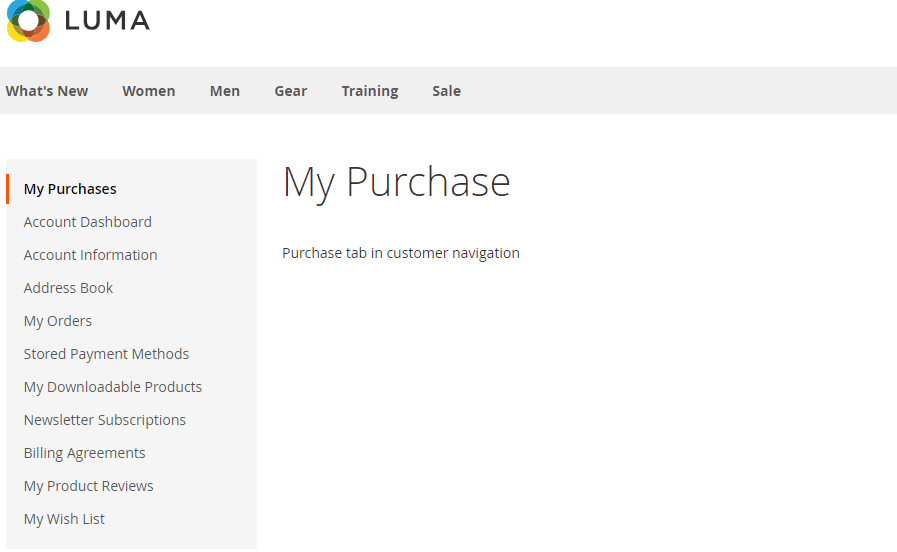
Add, Remove or Reorder links in My Account Navigation – Magento 2

In this code snippet, we will see how to add a custom link in My Account navigation, how to remove a link from My Account navigation and how to reorder a link in My Account navigation.
Add a Custom link
To add a custom link in My Account navigation, we just need to create customer_account.xml under app/code/Codextblog/Purchase/view/frontend/layout directory with below code
<?xml version="1.0"?>
<page xmlns:xsi="http://www.w3.org/2001/XMLSchema-instance" xsi:noNamespaceSchemaLocation="urn:magento:framework:View/Layout/etc/page_configuration.xsd">
    <body>
        <referenceBlock name="customer_account_navigation">
            <block class="Magento\Framework\View\Element\Html\Link\Current" name="customer-account-navigation-purchase">
                <arguments>
                    <argument name="path" xsi:type="string">purchase</argument>
                    <argument name="label" xsi:type="string">My Purchases</argument>
                </arguments>
            </block>
        </referenceBlock>
    </body>
</page>
In above XML, argument path is the frontName of our module in which we have defined the controller, layout and template file. In my case, frontName of the module is purchase. so we need to create an appropriate controller, layout and template file for our module.
Create a controller file Index.php under app/code/Codextblog/Purchase/Controller/Index directory.
<?php
namespace Codextblog\Purchase\Controller\Index;

class Index extends \Magento\Framework\App\Action\Action
{

    protected $resultPageFactory;

    /**
     * Constructor
     *
     * @param \Magento\Framework\App\Action\Context  $context
     * @param \Magento\Framework\View\Result\PageFactory $resultPageFactory
     */
    public function __construct(
        \Magento\Framework\App\Action\Context $context,
        \Magento\Framework\View\Result\PageFactory $resultPageFactory
    ) {
        $this->resultPageFactory = $resultPageFactory;
        parent::__construct($context);
    }

    /**
     * Execute view action
     *
     * @return \Magento\Framework\Controller\ResultInterface
     */
    public function execute()
    {

        $resultPage = $this->resultPageFactory->create();
        $resultPage->getConfig()->getTitle()->set('My Purchase');
        return $resultPage;
    }
}
Create a layout file purchase_index_index.xml file under app/code/Codextblog/Purchase/view/frontend/layout directory.
<?xml version="1.0"?>
<page xmlns:xsi="http://www.w3.org/2001/XMLSchema-instance" xsi:noNamespaceSchemaLocation="urn:magento:framework:View/Layout/etc/page_configuration.xsd">
    <update handle="customer_account"/>
    <body>
        <referenceContainer name="content">
            <block as="purchase_index_index" class="Magento\Framework\View\Element\Template" name="purchase.index.index" template="Codextblog_Purchase::index/index.phtml"/>
        </referenceContainer>
    </body>
</page>
Create a template file index.phtml under app/code/Codextblog/view/frontend/templates/index directory
<?php

echo "Purchase tab in customer navigation";
After implementing above code you will get your new tab added under customer navigation.

Reorder a link
Now we will see how to reorder a specific link in customer navigation. We will move the Address Book link after My Orders link
Create a xml file customer_account.xml under app/code/Codextblog/Purchase/view/frontend/layout directory and add a code
<?xml version="1.0"?>
<page xmlns:xsi="http://www.w3.org/2001/XMLSchema-instance" xsi:noNamespaceSchemaLocation="urn:magento:framework:View/Layout/etc/page_configuration.xsd">
    <body>
       <referenceBlock name="customer_account_navigation">

        <move element="customer-account-navigation-address-link" destination="customer_account_navigation" after="customer-account-navigation-orders-link" />

        </referenceBlock>
    </body>
</page>
Remove a link
Using same XML file we can remove the specific link. We will remove Billing agreements link.
Create a xml file customer_account.xml under app/code/Codextblog/Purchase/view/frontend/layout directory and add a code
<page xmlns:xsi="http://www.w3.org/2001/XMLSchema-instance" xsi:noNamespaceSchemaLocation="urn:magento:framework:View/Layout/etc/page_configuration.xsd">
    <body>
       <referenceBlock name="customer_account_navigation">

          <referenceBlock name="customer-account-navigation-billing-agreements-link" remove="true"/>

        </referenceBlock>
    </body>
</page>
Hope this code snippet helps you. If you liked this post, then please like us on Facebook and follow us on Twitter.


Leave a Comment
(1 Comment)
” Add links in My Account” no longer works for Magento 2.3.5. Maybe i’m doing something wrong but i copied code exactly folder and code.
Useful Magento 2 Articles
Author Info
Chirag
Connect With Me