How to Setup a Multiple Website in Single Magento 2 Instance
Magento 2 provide a great capability to create a more than one website withing single Magento 2 installation. You can have different theme or design for your multiple websites. All the entities like customers, orders, cart etc are separately manipulated for each website, from your single Magento 2 installation.
Today we will utilize this great features of Magento 2 and see how to set up multiple websites in single Magento 2 Instance
Create a Website, Store and Store views in Magento 2 admin
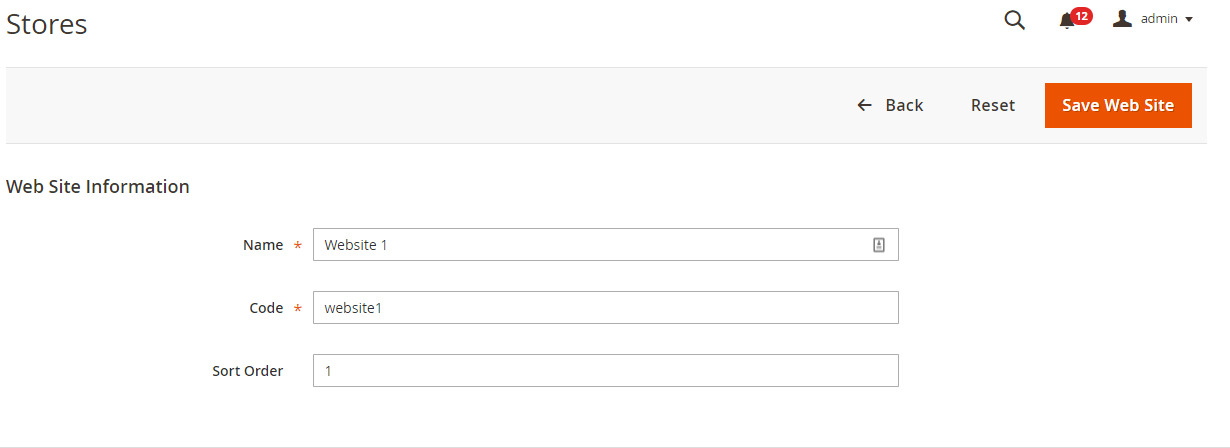
Step 1: Create Website
To create a website follow steps
1. Go to Magento 2 Admin > Stores > All Stores
2. Click on Create a website. Enter Name, Code and Sort Order. Save it.
Step 2: Create Store
To create a store follow steps
1. Go to Magento 2 Admin > Stores > All Stores
2. Click on Create a Store.
3. Select the recently created website, enter the name of the store and select the Root category. By default, there is only one option “Default Category”.
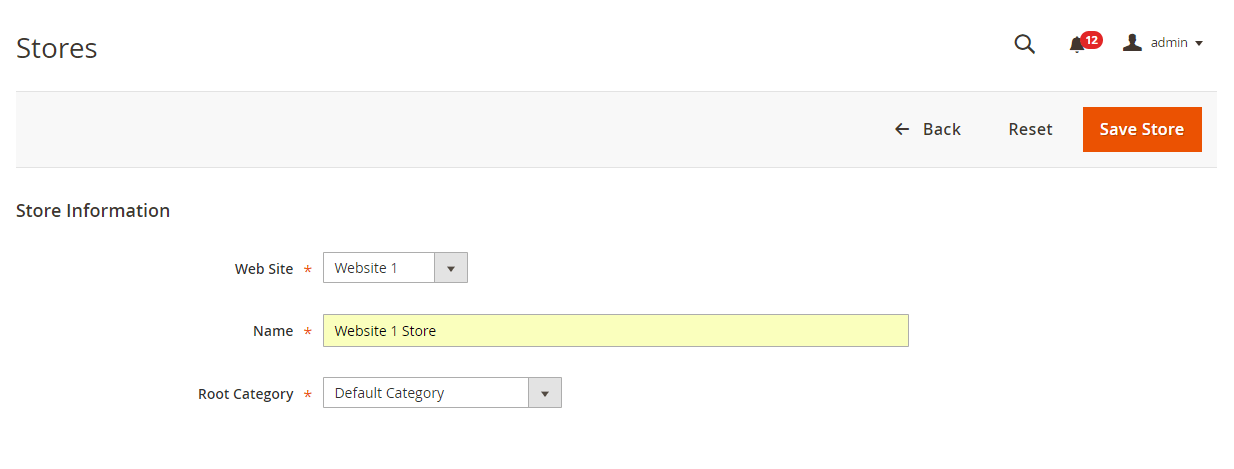
If you want to display different root category for your newly created website you can create new root category from Magento Admin > Products > Categories > Add Root Category. Once you create new root category, it will visible in Root category options while creating a new store.
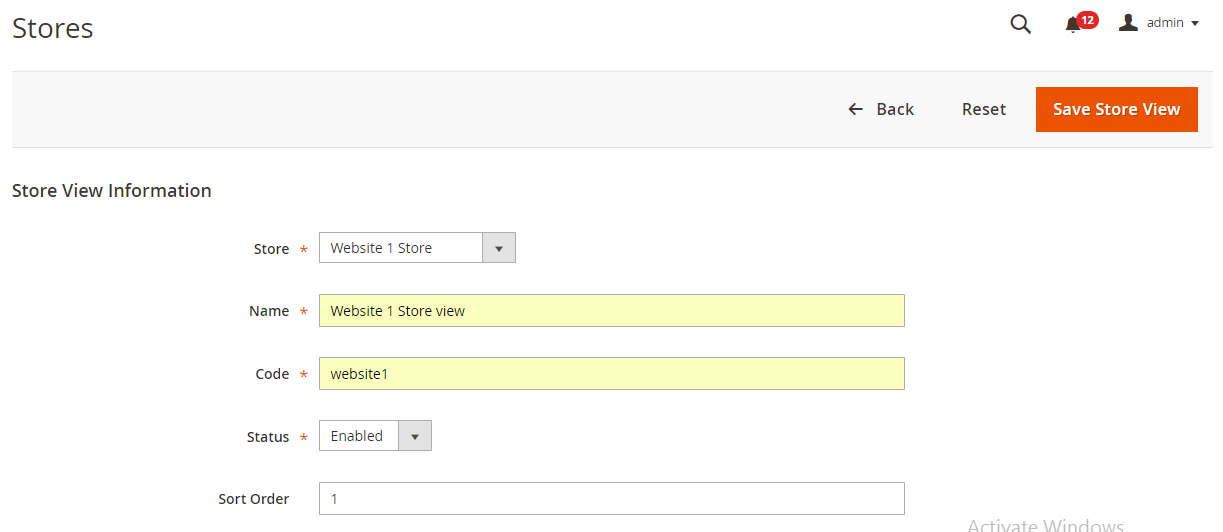
Step 3: Create Store View
To create a store follow steps
1. Go to Magento 2 Admin > Stores > All Stores
2. Click on Create a Store View.
3. Select the recently created store, enter the name of the store view, enter the code, select status to Enable and enter the sort order
Create a website directory under Magento 2 Installation Root directory
Step 4: Create a website directory
1. Go to Magento 2 root directory and create a new directory called website1 (you can give any unique name to this directory)
2. copy the .htaccess file from Magento 2 root directory to website1 directory
3. copy the index.php file from Magento 2 root directory to website1 directory
4. Replace the code in index.php file with following code
<?php
/**
 * Application entry point
 *
 * Example - run a particular store or website:
 * --------------------------------------------
 * require __DIR__ . '/app/bootstrap.php';
 * $params = $_SERVER;
 * $params[\Magento\Store\Model\StoreManager::PARAM_RUN_CODE] = 'website2';
 * $params[\Magento\Store\Model\StoreManager::PARAM_RUN_TYPE] = 'website';
 * $bootstrap = \Magento\Framework\App\Bootstrap::create(BP, $params);
 * \/** @var \Magento\Framework\App\Http $app *\/
 * $app = $bootstrap->createApplication('Magento\Framework\App\Http');
 * $bootstrap->run($app);
 * --------------------------------------------
 *
 * Copyright © 2013-2017 Magento, Inc. All rights reserved.
 * See COPYING.txt for license details.
 */

try {
    require '../app/bootstrap.php';
} catch (\Exception $e) {
    echo <<<HTML
<div style="font:12px/1.35em arial, helvetica, sans-serif;">
    <div style="margin:0 0 25px 0; border-bottom:1px solid #ccc;">
        <h3 style="margin:0;font-size:1.7em;font-weight:normal;text-transform:none;text-align:left;color:#2f2f2f;">
        Autoload error</h3>
    </div>
    <p>{$e->getMessage()}</p>
</div>
HTML;
    exit(1);
}


$params = $_SERVER;
$params[\Magento\Store\Model\StoreManager::PARAM_RUN_CODE] = 'website1';
$params[\Magento\Store\Model\StoreManager::PARAM_RUN_TYPE] = 'website';
$bootstrap = \Magento\Framework\App\Bootstrap::create(BP, $params);
/** @var \Magento\Framework\App\Http $app */
$app = $bootstrap->createApplication('Magento\Framework\App\Http');
$bootstrap->run($app);
In line no 38 we need to pass a website code which we have entered while creating a website in step 1 (In our case website code is website1).
Configure website urls
Step 5: Go to Magento 2 Admin > Stores > Configuration. Select newly created website (In our case it is Website 1 ) from upper left Store view section.
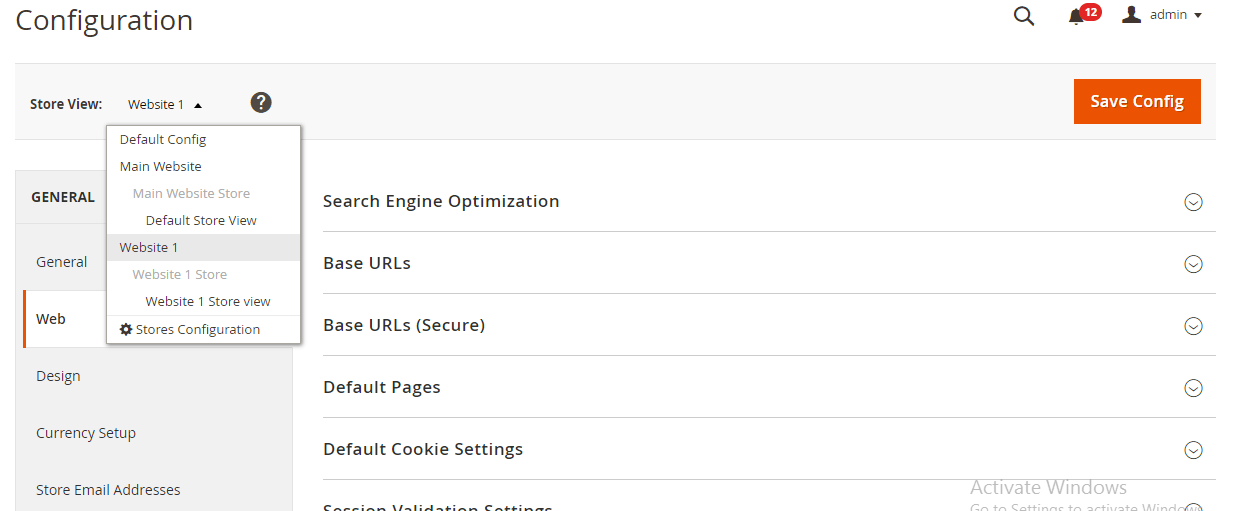
1. Go to General > Web
2. Under the Base URLs section change the URLs as follows
-
Base URL: http://127.0.0.1/magento-2.1.9-sampledata/website1/
Base Link URL: http://127.0.0.1/magento-2.1.9-sampledata/website1/
Base URL for Static View Files: http://127.0.0.1/magento-2.1.9-sampledata/pub/static/
Base URL for User Media Files: http://127.0.0.1/magento-2.1.9-sampledata/pub/media/
3. Under the Base URLs (secure) section change the URLs as follows
-
Secure Base URL: https://127.0.0.1/magento-2.1.9-sampledata/website1/
Secure Base Link URL: https://127.0.0.1/magento-2.1.9-sampledata/website1/
Configure theme for newly created website
Go to Magento 2 Admin > Content > Design > Configuration. Here you can see your newly created website along with main website (if you can’t see newly created website, Please do reindex and check).

Step 6: Edit your newly created website row and apply the desire theme and save it. After complete this step please run below command
php bin/magento setup:static-content:deploy
That’s it. Our newly created website is ready and URL of the website is http://127.0.0.1/magento-2.1.9-sampledata/website1/
In this post, we have demonstrated multiple website creations in localhost. In next article, we will see how to setup multiple website creations on server