How to Upload Image or File in Custom Module using UI Component in Magento 2

Many times while developing a custom module in admin, a developer needs to provide a facility to upload image or file in custom module. Magento 2 provides the FileUploader UI Component to upload an image or file in a custom module. Using FileUploader UI Component you can provide a button to upload an image using drag & drop or manually. You can also select the existing image from the gallery.
In this article, We will see how to upload image or file in a custom module using UI Component. We will add Image Uploader field in Magento 2 Admin form. We will highlight only the required files and not the whole module. We assume that the Magento 2 backend module is already created. While writing this article our Magento 2 version is 2.3.
Getting Started: Development
Step 1: Define field in database to save the image name.
To do this you need to add the field name in your db_schema.xml file.
<column length="255" name="image" nullable="false" xsi:type="varchar"/>
Step 2: Define field in your admin form inside ui_component directory.
<field formElement="imageUploader" name="icon" sortOrder="40" >
    <argument name="data" xsi:type="array">
        <item name="config" xsi:type="array">
            <item name="source" xsi:type="string">Demo</item>
        </item>
    </argument>
    <settings>
        <elementTmpl>ui/form/element/uploader/image</elementTmpl>
        <dataType>string</dataType>
        <label translate="true">Image</label>
        <visible>true</visible>
        <validation>
            <rule name="required-entry" xsi:type="boolean">true</rule>
        </validation>
    </settings>
    <formElements>
        <imageUploader>
            <settings>
                <required>true</required>
                <uploaderConfig>
                    <param xsi:type="url" name="url" path="codextblog_imageupload/feature_image/upload"/>
                </uploaderConfig>
                <previewTmpl>Codextblog_Imageupload/image-preview</previewTmpl>
                <openDialogTitle>Media Gallery</openDialogTitle>
                <allowedExtensions>jpg jpeg gif png</allowedExtensions>
                <maxFileSize>4194304</maxFileSize>
            </settings>
        </imageUploader>
    </formElements>
</field>
Here, uploaderConfig tag defines the upload controller. Once you select a file or image, Magento will look for this controller to upload that file or image.
The previewTmpl tag defines the HTML template to preview the uploaded image.
Other tags in the above code are self-explanatory.
Step 3: Define Preview Template insider adminhtml’s web/template directory
<div class="file-uploader-summary">
    <div class="file-uploader-preview image-uploader-preview">
        <a class="image-uploader-preview-link" attr="href: $parent.getFilePreview($file)" target="_blank">
            <div class="file-uploader-spinner image-uploader-spinner" />
            <img
                class="preview-image"
                tabindex="0"
                event="load: $parent.onPreviewLoad.bind($parent)"
                attr="
                    src: $parent.getFilePreview($file),
                    alt: $file.name,
                    title: $file.name">
        </a>

        <div class="actions">
            <button
                type="button"
                class="action-remove"
                data-role="delete-button"
                attr="title: $t('Delete image')"
                disable="$parent.disabled"
                click="$parent.removeFile.bind($parent, $file)">
                <span translate="'Delete image'"/>
            </button>
        </div>
    </div>

    <div class="file-uploader-filename" text="$file.name"/>
    <div class="file-uploader-meta">
        <text args="$file.previewWidth"/>x<text args="$file.previewHeight"/>
    </div>
</div>
Step 4: Define Upload Controller. Create Upload.php inside path you have define in uploaderConfig directory.
<?php

namespace Codextblog\Imageupload\Controller\Adminhtml\Feature\Image;

use Exception;
use Codextblog\Imageupload\Model\ImageUploader;
use Magento\Backend\App\Action;
use Magento\Backend\App\Action\Context;
use Magento\Framework\App\Action\HttpPostActionInterface;
use Magento\Framework\Controller\ResultFactory;
use Magento\Framework\Controller\ResultInterface;

class Upload extends Action implements HttpPostActionInterface
{
    /**
     * Image uploader
     *
     * @var ImageUploader
     */
    protected $imageUploader;

    /**
     * Upload constructor.
     *
     * @param Context $context
     * @param ImageUploader $imageUploader
     */
    public function __construct(
        Context $context,
        ImageUploader $imageUploader
    ) {
        parent::__construct($context);
        $this->imageUploader = $imageUploader;
    }
    /**
     * Upload file controller action
     *
     * @return ResultInterface
     */
    public function execute()
    {
        $imageId = $this->_request->getParam('param_name', 'image');

        try {
            $result = $this->imageUploader->saveFileToTmpDir($imageId);
        } catch (Exception $e) {
            $result = ['error' => $e->getMessage(), 'errorcode' => $e->getCode()];
        }
        return $this->resultFactory->create(ResultFactory::TYPE_JSON)->setData($result);
    }
}
Here, You can see we have used imageUploader model file to call saveFileToTmpDir function. This function will upload the file into temparory directory inside pub/media directory. Let’s define this model file and add some other functions which are needed to upload file into specific directory.
Step 5: Define ImageUploader.php under your Model directory.
<?php

namespace Codextblog\Imageupload\Model;

use Exception;
use Magento\Framework\App\Filesystem\DirectoryList;
use Magento\Framework\Exception\FileSystemException;
use Magento\Framework\Exception\LocalizedException;
use Magento\Framework\File\Uploader;
use Magento\Framework\Filesystem;
use Magento\Framework\Filesystem\Directory\WriteInterface;
use Magento\Framework\UrlInterface;
use Magento\MediaStorage\Helper\File\Storage\Database;
use Magento\MediaStorage\Model\File\UploaderFactory;
use Magento\Store\Model\StoreManagerInterface;
use Psr\Log\LoggerInterface;

/**
 * Feature image uploader
 */
class ImageUploader
{
    const IMAGE_TMP_PATH = 'codextblog/tmp/feature';

    const IMAGE_PATH = 'codextblog/feature';
    /**
     * Core file storage database
     *
     * @var Database
     */
    protected $coreFileStorageDatabase;

    /**
     * Media directory object (writable).
     *
     * @var WriteInterface
     */
    protected $mediaDirectory;

    /**
     * Uploader factory
     *
     * @var UploaderFactory
     */
    protected $uploaderFactory;

    /**
     * Store manager
     *
     * @var StoreManagerInterface
     */
    protected $storeManager;

    /**
     * @var LoggerInterface
     */
    protected $logger;

    /**
     * Base tmp path
     *
     * @var string
     */
    protected $baseTmpPath;

    /**
     * Base path
     *
     * @var string
     */
    protected $basePath;

    /**
     * Allowed extensions
     *
     * @var string
     */
    protected $allowedExtensions;

    /**
     * List of allowed image mime types
     *
     * @var string[]
     */
    protected $allowedMimeTypes;

    /**
     * ImageUploader constructor
     *
     * @param Database $coreFileStorageDatabase
     * @param Filesystem $filesystem
     * @param UploaderFactory $uploaderFactory
     * @param StoreManagerInterface $storeManager
     * @param LoggerInterface $logger
     * @param string $baseTmpPath
     * @param string $basePath
     * @param string[] $allowedExtensions
     * @param string[] $allowedMimeTypes
     * @throws FileSystemException
     */
    public function __construct(
        Database $coreFileStorageDatabase,
        Filesystem $filesystem,
        UploaderFactory $uploaderFactory,
        StoreManagerInterface $storeManager,
        LoggerInterface $logger,
        $baseTmpPath = self::IMAGE_TMP_PATH,
        $basePath = self::IMAGE_PATH,
        $allowedExtensions = [],
        $allowedMimeTypes = []
    ) {
        $this->coreFileStorageDatabase = $coreFileStorageDatabase;
        $this->mediaDirectory = $filesystem->getDirectoryWrite(DirectoryList::MEDIA);
        $this->uploaderFactory = $uploaderFactory;
        $this->storeManager = $storeManager;
        $this->logger = $logger;
        $this->baseTmpPath = $baseTmpPath;
        $this->basePath = $basePath;
        $this->allowedExtensions = $allowedExtensions;
        $this->allowedMimeTypes = $allowedMimeTypes;
    }

    /**
     * Set base tmp path
     *
     * @param string $baseTmpPath
     *
     * @return void
     */
    public function setBaseTmpPath($baseTmpPath)
    {
        $this->baseTmpPath = $baseTmpPath;
    }

    /**
     * Set base path
     *
     * @param string $basePath
     *
     * @return void
     */
    public function setBasePath($basePath)
    {
        $this->basePath = $basePath;
    }

    /**
     * Set allowed extensions
     *
     * @param string[] $allowedExtensions
     *
     * @return void
     */
    public function setAllowedExtensions($allowedExtensions)
    {
        $this->allowedExtensions = $allowedExtensions;
    }

    /**
     * Retrieve base tmp path
     *
     * @return string
     */
    public function getBaseTmpPath()
    {
        return $this->baseTmpPath;
    }

    /**
     * Retrieve base path
     *
     * @return string
     */
    public function getBasePath()
    {
        return $this->basePath;
    }

    /**
     * Retrieve allowed extensions
     *
     * @return string[]
     */
    public function getAllowedExtensions()
    {
        return $this->allowedExtensions;
    }

    /**
     * Retrieve path
     *
     * @param string $path
     * @param string $imageName
     *
     * @return string
     */
    public function getFilePath($path, $imageName)
    {
        return rtrim($path, '/') . '/' . ltrim($imageName, '/');
    }

    /**
     * Checking file for moving and move it
     *
     * @param string $imageName
     *
     * @return string
     *
     * @throws LocalizedException
     */
    public function moveFileFromTmp($imageName)
    {
        $baseTmpPath = $this->getBaseTmpPath();
        $basePath = $this->getBasePath();

        $baseImagePath = $this->getFilePath(
            $basePath,
            Uploader::getNewFileName(
                $this->mediaDirectory->getAbsolutePath(
                    $this->getFilePath($basePath, $imageName)
                )
            )
        );
        $baseTmpImagePath = $this->getFilePath($baseTmpPath, $imageName);

        try {
            $this->coreFileStorageDatabase->copyFile(
                $baseTmpImagePath,
                $baseImagePath
            );
            $this->mediaDirectory->renameFile(
                $baseTmpImagePath,
                $baseImagePath
            );
        } catch (Exception $e) {
            throw new LocalizedException(
                __('Something went wrong while saving the file(s).')
            );
        }

        return $imageName;
    }

    /**
     * Checking file for save and save it to tmp dir
     *
     * @param string $fileId
     *
     * @return string[]
     *
     * @throws LocalizedException
     */
    public function saveFileToTmpDir($fileId)
    {
        $baseTmpPath = $this->getBaseTmpPath();

        /** @var \Magento\MediaStorage\Model\File\Uploader $uploader */
        $uploader = $this->uploaderFactory->create(['fileId' => $fileId]);
        $uploader->setAllowedExtensions($this->getAllowedExtensions());
        $uploader->setAllowRenameFiles(true);
        if (!$uploader->checkMimeType($this->allowedMimeTypes)) {
            throw new LocalizedException(__('File validation failed.'));
        }
        $result = $uploader->save($this->mediaDirectory->getAbsolutePath($baseTmpPath));
        unset($result['path']);

        if (!$result) {
            throw new LocalizedException(
                __('File can not be saved to the destination folder.')
            );
        }

        /**
         * Workaround for prototype 1.7 methods "isJSON", "evalJSON" on Windows OS
         */
        $result['tmp_name'] = str_replace('\\', '/', $result['tmp_name']);
        $result['url'] = $this->storeManager
                ->getStore()
                ->getBaseUrl(
                    UrlInterface::URL_TYPE_MEDIA
                ) . $this->getFilePath($baseTmpPath, $result['file']);
        $result['name'] = $result['file'];

        if (isset($result['file'])) {
            try {
                $relativePath = rtrim($baseTmpPath, '/') . '/' . ltrim($result['file'], '/');
                $this->coreFileStorageDatabase->saveFile($relativePath);
            } catch (Exception $e) {
                $this->logger->critical($e);
                throw new LocalizedException(
                    __('Something went wrong while saving the file(s).')
                );
            }
        }

        return $result;
    }
}
In this file, we have defined two constant IMAGE_TMP_PATH where a temporary image will be uploaded and IMAGE_PATH where the actual image will be uploaded.
Step 6: Define image configuration in di.xml inside module’s etc directory.
<virtualType name="Codextblog\Imageupload\ReferenceImageUpload" type="Codextblog\Imageupload\Model\ImageUploader">
    <arguments>
        <argument name="baseTmpPath" xsi:type="string">codextblog/tmp/feature</argument>
        <argument name="basePath" xsi:type="string">codextblog/feature</argument>
        <argument name="allowedExtensions" xsi:type="array">
            <item name="jpg" xsi:type="string">jpg</item>
            <item name="jpeg" xsi:type="string">jpeg</item>
            <item name="gif" xsi:type="string">gif</item>
            <item name="png" xsi:type="string">png</item>
        </argument>
        <argument name="allowedMimeTypes" xsi:type="array">
            <item name="jpg" xsi:type="string">image/jpg</item>
            <item name="jpeg" xsi:type="string">image/jpeg</item>
            <item name="gif" xsi:type="string">image/gif</item>
            <item name="png" xsi:type="string">image/png</item>
        </argument>
    </arguments>
</virtualType>

<type name="Codextblog\Imageupload\Controller\Adminhtml\Feature\Image\Upload">
    <arguments>
        <argument name="imageUploader" xsi:type="object">Codextblog\Imageupload\ReferenceImageUpload</argument>
    </arguments>
</type>
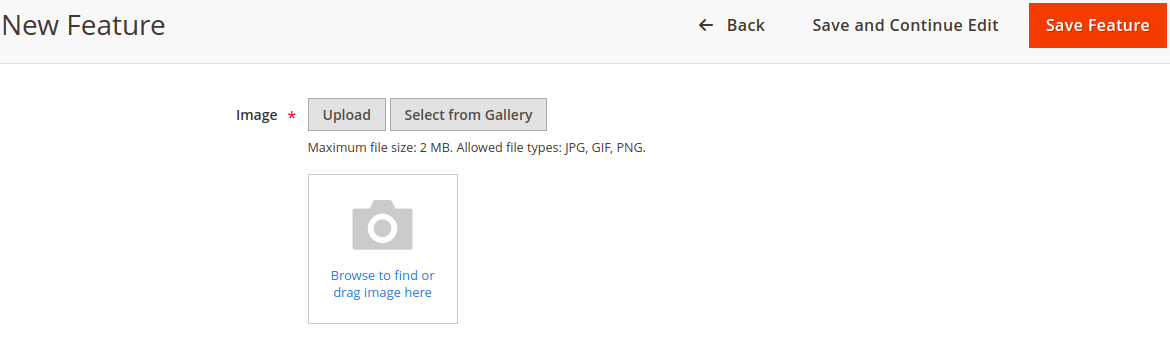
After following all the above steps please run all deployment commands. If everything goes well then you can see the image upload field in your custom module like below.
Now the image will be uploaded but the image name will not save into the database. To save the image name into the database follow below additional steps.
Step 7: Add below code inside Adminhtml Save.php file’s execute method.
public function execute()
{
   if (isset($data['image'][0]['name']) && isset($data['image'][0]['tmp_name'])) {
                $data['image'] = $data['image'][0]['name'];
                $this->imageUploader->moveFileFromTmp($data['image']);
            } elseif (isset($data['image'][0]['name']) && !isset($data['image'][0]['tmp_name'])) {
                $data['image'] = $data['image'][0]['name'];
            } else {
                $data['image'] = '';
            }
}
You need to add this code before save the $data array. This code will actually look for the uploaded image name. If image name present then it will upload that image into the directory specified in imageUploader.
Now to display the uploaded image into the edit page we need to pass the image information in DataProvider.php file’s getData method.
Step 8: Inside your $items foreach loop add below lines to provide image information.
if (isset($data['image'])) {
    $name = $data['image'];
    unset($data['image']);
    $data['image'][0] = [
        'name' => $name,
        'url' => $mediaUrl.'codextblog/feature/'.$name
    ];
}
This is how we can utilize the imageUploader component to upload image or file in custom module in Magento 2.
While implementing, if you experience any errors or difficulty, feel free to mention in the comment below. I’ll be glad to help you.